There is almost nothing more pleasing than walking into a house with beautifully polished timber floors. The natural character of the exposed timber adds warmth and personality to the house.
Sanding floors can be a daunting job, but it doesn’t need to be. It can be extremely rewarding when you stand back and enjoy your finished DIY project.
The following steps are a how-to guide with some tips and techniques to get the timber finish you want in your house.
Make sure that you allow enough time to do the job and have everything you need to be organised before you start. Depending on what finish you want, it will be worth talking to your local hardware or paint store about the right product to use and drying times.
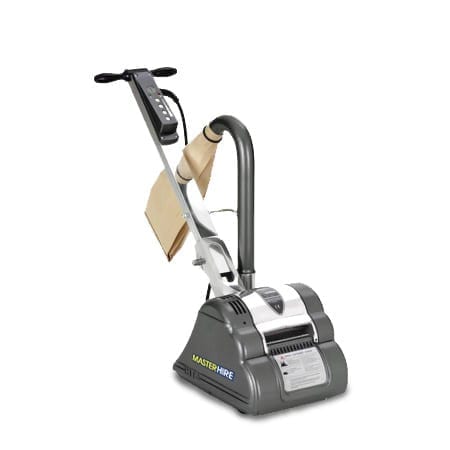
Hire a drum floor sander and floor edger with Master Hire, (we can also supply the sandpaper for each machine).
Ensure you read and understand the instructions of each sander carefully before you begin as these may vary from model to model. Ensure the area you will be sanding is well ventilated as the machines will create a lot of dust (open windows or use fans). Ensure power leads are out of the way so they don’t become a trip hazard or are run over by the sander. As these machines draw a lot of power, ensure the extension leads you are using are suitable so not to cause machine burn out. We recommend lengths no longer than 20m.
Ensure you use all the correct PPE including dust masks, safety glasses and earplugs – your health and safety is paramount.
-
- Preparation – Remove everything out of the room including all furniture and even curtains… it is going to get very dusty. Remove any floor coverings and ensure that any staples or screws are removed and nails are punched down or removed. These are a killer for sandpaper as they will shred a sanding sheet in seconds. Fill any gaps and repair the floor as required. Remove the skirting boards to ensure you sand right to the edge of the timber. It is important to take time and effort in the preparation phase as you don’t want to have to come back and redo this.
- Using the drum sander – Start with a medium grit sandpaper (e.g. 60/80 grit) and ensure it is fitted tightly on the drum facing the correct direction. Do a small area and see how your floor responds to it. You may find that you need to use a more coarse grade on the floor to begin with. If you floor isn’t flat, sand at a 45-degree angle in the direction of the floor boards. Overlap each run so that each is blended into the next. As you near the end of the pass, gradually lift the drum off the floor before you come to a stop. Practice this so you don’t end up with hollows at the end of your floor boards. Once you have the floor evenly sanded with this coarse grade, change the paper to a finer grade and continue to sand along the grain.
- Using the floor edger – Ensure the sandpaper disc and locking bolt is secured tightly on the machine before you begin. Sand along the grain of the timber smoothly to reduce the chance of putting divots in the floor. Use the same grade paper as you used with the drum sander to ensure you end up with the same finish.
If your floor boards have already been polished, if possible find out what product has been used previously. Typically, it’s either a wax or an oil finish, or possibly a polyurethane varnish. When buying your new polish (vanish), ensure you find a product that’s right for the type of floor boards you have. If in doubt, ask your local hardware or paint store for advice when choosing a product.
Test a small area before polishing your floor boards
Before you dive straight into polishing the entire area, test a small section first, preferably underneath a piece of furniture or in a corner. If the polish damages the floor boards or creates a discolouration, stop and check you are using the right product for your floor boards. Once you have confirmed that your polish is the correct one to use, it’s time to start covering the entire area. This is a very satisfying process and you will quickly see your floor boards spring to life with a rich vibrant finish.
Allow the polish to dry completely before walking on it
Read the product manufacturer’s instructions carefully before you begin your project. After applying the first layer of product to your floor boards, allow it to completely dry before apply more layers. Keep in mind that different products may have difference drying times and these will be indicated on the product label. Try not to walk on the newly polished floor for at least 24 hours, as it may be sticky and leave marks on the surface. Once the area is dry enough to walk on, we recommend waiting another 24 hours before putting any furniture or rugs back on the area.
If you would like to know more about sanding your timber floors or if you have any questions about our range of floor sanders and other equipment, call Master Hire on 1300 107 107 to talk to one of our friendly team members.